Open topic with navigation
Capture Device Overview
The System Profile supports multiple Hamamatsu Image Capture Devices installed in the same profile. This provides several useful facilities:
- A single profile can contain multiple different capture devices.
- Dual Hamamatsu cameras may be added. Dual DCAM supported cameras requires two cameras of same model, proper equipment and installation.
- The same capture devices can be configured with different Capture properties (spatial resolutions and color depth). See the Binning and SubArray Panel in the Capture Panel.
- Different Profiles can contain Capture devices configured for specific users or applications.
Before adding a camera to a profile the appropriate DCAM drivers must be installed. It is also important to note that in order to accommodate multiple users on one system, it is possible to setup a profile for each user. Profile information is stored in the User Registry; this means that the user must have Administrator or Standard User (Power User) rights. Restricted user accounts will not allow storage of profile settings in the registry.
How to add a Camera to a Profile
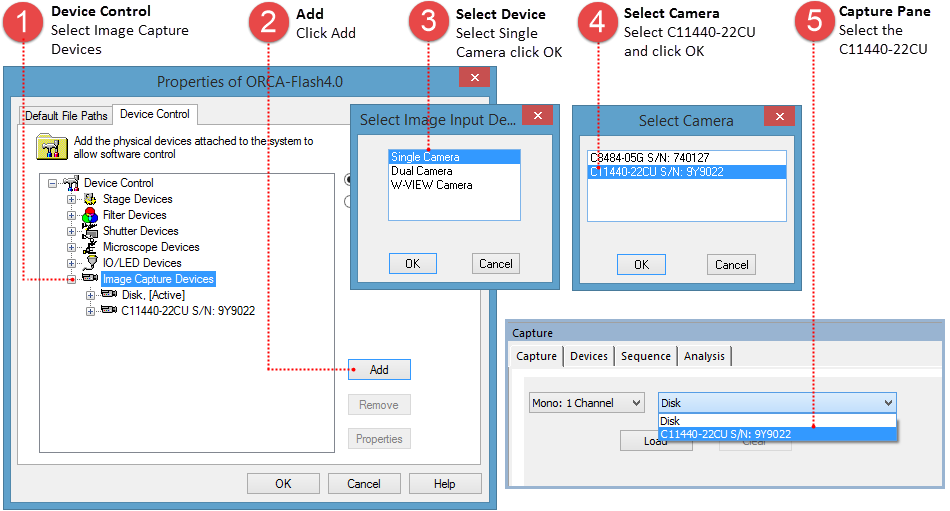
Go to File, select Current Profile, go to Device Control and follow the instructions below.

How to add the ORCA-D2 to a Profile
The example below shows the steps for adding the Hamamatsu ORCA-D2 (C11254-10B) to an existing profile.
- Go to File and select Current Profile.
- Go to the Device Control Tab, select Image Capture Devices and click Add.
- Select Single Camera and click OK.
- Select C11254-10B (ORCA-D2) S/N: ####### and click OK. (Note: Only properly installed DCAM supported cameras will appear in the Select Camera dialog.)
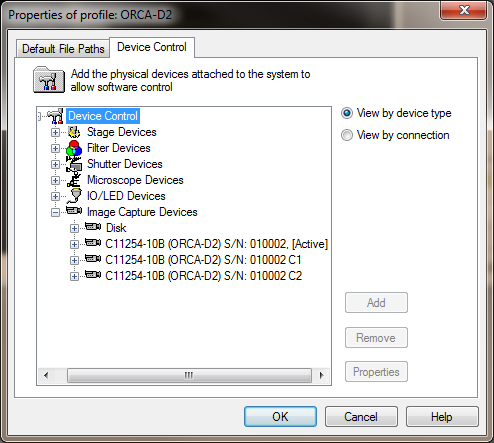
- The ORCA-D2 will appear as three image capture devices, one for each mode of operation. The ORCA-D2 can operate using both chips, chip 1 or chip 2. Click OK to add it to the profile.
- Go to the Capture Pane and select C11254-10B (ORCA-D2) S/N . . from the Camera drop-menu.

How to add Dual Cameras to a Profile
The example below shows the steps for adding dual Hamamatsu ImagEMs (C9100-13) to an existing profile.
- Go to File and select Current Profile.
- Go to the Device Control Tab, select Image Capture Devices and click Add.
- Select Dual Camera and click OK.
- Select C9100-13 with M#####-## S/N: #######+S/N: ###### and click OK. (Note: Only properly installed DCAM supported cameras will appear in the Select Camera dialog.)
- The dual 9100-13's are now displayed as a capture device, click OK to add it to the profile.
- Go to the Capture Pane and select the C9100-13 with M###. . . . from the Camera drop-menu.
How to add a W-VIEW Camera to a Profile
The example below shows the steps for adding a Hamamatsu ORCA-Flash4.0 LT for use with the W-VIEW GEMINI to an existing profile. The W-VIEW GEMINI is a device with image splitting optics that is able to produce a pair of dual wavelength images onto the chip of a single camera. When an ORCA-Flash4.0 LT (or any other supported camera) is added as a W-VIEW Camera, it will function in a similar manor as having dual cameras.
- Go to File and select Current Profile.
- Go to the Device Control Tab, select Image Capture Devices and click Add.
- Select W-VIEW Camera and click OK.
- Select C11440-42U S/N: ###### W-VIEW and click OK. (Note: Only properly installed DCAM supported cameras will appear in the Select Camera dialog.)
- The camera is now listed as a capture device, click OK to add it to the profile.
- Go to the Capture Pane and select the C11440-42U S/N: ###### W-VIEW from the Camera drop-menu.


